 Here’s a post about making a sweet autumnal wreath using an old wreath form and some handmade paper flowers. All of the materials I used were from my stash – validating my propensity to hoard craft supplies. If you’d like to learn how I make these types of wreaths, let’s go!
 I’ve hoarded wreath forms for years by removing the greenery from Christmas wreaths and stashing the forms away. If you don’t have your own collection, you’ll need to buy a wreath or make one for this project. NB: You could also simply attach flowers to some ribbon and make a swag. I have plenty of wreath forms, and as I knew my wreath would hang where the form itself would be visible no matter how well-covered in flowers, I masked the form with single crochet in a lovely chocolate-colored yarn. You might prefer to leave your form bare nakkid…
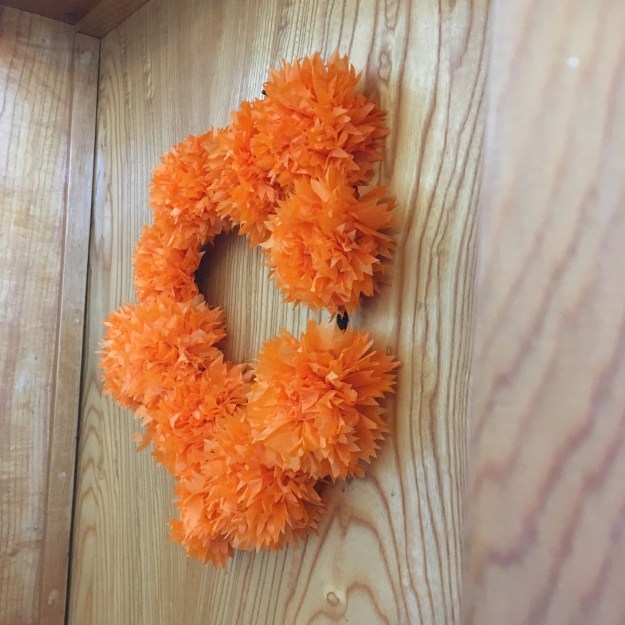
 This wreath’s flowers remind me of marigolds, those archetypal Day of the Dead flowers. The flowers were made by a process described in Martha Stewart’s Encyclopedia of Crafts (you can also find instructions on her website). I had a head start because I cut down some half-formed giant flowers from my stash that had been made by my mum ages ago. To start from scratch, review our Martha’s instructions by turning to page 265 of her book or by Googling “Martha Stewart paper flower pom-poms”. For this wreath, fold five pieces of 10” x 5” orange tissue paper into fans that are 5” by 1”. To make the flowers look like marigolds, snip the top and bottom edges into rows of little triangles. Tie a piece of thread around the middle of the folded tissue fans, or twist lengths of cloth-covered floral wire if you have it. Make more than you think you’ll need – I made 16 fans for my wreath, but only used 12. That’s crafting gospel: always have little more on hand than you think you’ll need.
 Unfolding the tissue layers is fiddly, but simple. Holding the fan in one hand, use that hand’s fingers to splay one side out, and use your other hand’s fingers to gently tease each tissue layer apart. For this project, which requires flat-backed flowers, separate the layers towards the same side. Pull from the base of each “petal” or you’ll tear the damn things. Grrr. Repeat for the other half of the flower. Take your time and enjoy the process – think of this as an offering for the repose of the souls of the dead, which should calm you down. Attach the resulting flowers to your form with the thread or wire used to create the center of each flower. I wanted my wreath to be asymmetrical, so I played around with placement until I was happy with the balance. If you use floral wire you prob’ly won’t need to reinforce the back of the flowers with tape. Unfortunately, the thin thread I used required reinforcement to keep the attached flowers from flopping.
And there you have it: you’ve made a pretty wreath that that you can hang anywhere indoors and something that validates your habit of hoarding craft supplies. Bonus! That’s it for this week, my pets. Until next time and as always, very fondly, yr little munakins.
